需要特别注意的一些建议
API路由覆盖的问题
比如有两个接口 A get /v1/user/{user_id}和 B get /v1/user/profile如果A定义在B之前,那么B可能会被A覆盖路由。需要将A放到B之前。
JWT使用的建议
摘自极客时间课程《高并发系统实战课》
- 通讯过程必须使用 HTTPS 协议,这样才可以降低被拦截的可能。
- 要注意限制 token 的更换次数,并定期刷新 token,比如用户的 access_token 每天只能更换 50 次,超过了就要求用户重新登陆,同时 token 每隔 15 分钟更换一次。这样可以降低 token 被盗取后给用户带来的影响。
- Web 用户的 token 保存在 cookie 中时,建议加上 httponly、SameSite=Strict 限制,以防止 cookie 被一些特殊脚本偷走。
自定义接口返回内容
-
正常的响应序列化逻辑通过Response Encoder实现。
-
错误的序列化逻辑通过ErrorEncoder实现。
注意:自定义Encoder后,可能会遇到零值字段被忽略的情况,可以参考这个issue。具体的解决办法是
-
proto定义返回内容,然后将生成的类型在encoder中使用。
-
简单代码大致如下:
proto定义
import "google/protobuf/any.proto";
// BaseResponse is the  base response
message BaseResponse{
  int32  code = 1 [json_name = "code"];
  google.protobuf.Any data = 2 [json_name = "data"];
}
go代码
func CustomResponseEncoder() http.ServerOption {
	return http.ResponseEncoder(func(w http.ResponseWriter, r *http.Request, i interface{}) error {
		reply := &v1.BaseResponse{
			Code: 0,
		}
		if m, ok := i.(proto.Message); ok {
			payload, err := anypb.New(m)
			if err != nil {
				return err
			}
			reply.Data = payload
		}

		//reply := &Response{
		//	Code: 0,
		//	Data: i,
		//}
		codec := encoding.GetCodec("json")
		data, err := codec.Marshal(reply)
		if err != nil {
			return err
		}
		w.Header().Set("Content-Type", "application/json")
		w.Write(data)
		return nil
	})
}
需要注意的是如果涉及enum但现有接口返回是int的情况,需要把官方的json codec拷贝出来在
MarshalOptions添加一个选项MarshalOptions = protojson.MarshalOptions{ EmitUnpopulated: true, UseEnumNumbers: true,然后通过下面的代码注册json的codec即可使返回的enum使用数值而不是字符串。
import "github.com/go-kratos/kratos/v2/encoding"
func init() {
	encoding.RegisterCodec(codec{})
}
有个问题就是返回的json中会多出
"@type": "type.googleapis.comxxxxx"这样的一个字段。零值问题,还可以通过脚本将json tag清除 群友 Ccheers提供
ifeq ($(GOHOSTOS), darwin)
	find ./pb -name '*.pb.go' -exec  sed -i "" -e "s/,omitempty/,optional/g" {} \;
else
	find ./pb -name '*.pb.go' -exec  sed -i -e "s/,omitempty/,optional/g" {} \;
endif
HTTP API 的错误响应还有一些业界的标准,比如RFC 7807、RFC 9457等,感兴趣的可以参考下这篇文章 HTTP API 的错误响应标准 。在讨论到合理的错误码的时候,可以参考极客时间专栏《Go 语言项目开发实战》的内容。下面是节选
错误码设计建议
一套优秀的错误码设计思路:
- 有区别于http status code的业务码,业务码需要有一定规则,可以通过业务码判断出是哪类错误。
- 请求出错时,可以通过http status code直接感知到请求出错。
- 需要在请求出错时,返回详细的信息,通常包括 3 类信息:业务 Code 码、错误信息和参考文档(可选)。
- 返回的错误信息,需要是可以直接展示给用户的安全信息,也就是说不能包含敏感信息;同时也要有内部更详细的错误信息,方便 debug。返回的数据格式应该是固定的、规范的。错误信息要保持简洁,并且提供有用的信息。
业务 Code 码设计
要解决业务 Code 码如何设计这个问题,我们先来看下为什么要引入业务 Code 码。在实际开发中,引入业务 Code 码有下面几个好处:
可以非常方便地定位问题和定位代码行(看到错误码知道什么意思、grep 错误码可以定位到错误码所在行、某个错误类型的唯一标识)。
错误码包含一定的信息,通过错误码可以判断出错误级别、错误模块和具体错误信息。
Go 中的 HTTP 服务器开发都是引用 net/http 包,该包中只有 60 个错误码,基本都是跟 HTTP 请求相关的错误码,在一个大型系统中,这些错误码完全不够用,而且这些错误码跟业务没有任何关联,满足不了业务的需求。引入业务的 Code 码,则可以解决这些问题。
业务开发过程中,可能需要判断错误是哪种类型,以便做相应的逻辑处理,通过定制的错误可以很容易做到这点,例如:
if err == code.ErrBind { ...}这里要注意,业务 Code 码可以是一个整数,也可以是一个整型字符串,还可以是一个字符型字符串,它是错误的唯一标识。
通过研究腾讯云、阿里云、新浪的开放 API,我发现新浪的 API Code 码设计更合理些。所以,我参考新浪的 Code 码设计,总结出了我推荐的 Code 码设计规范:纯数字表示,不同部位代表不同的服务,不同的模块。错误代码说明:10010110: 服务。01: 某个服务下的某个模块。01: 模块下的错误码序号,每个模块可以注册 100 个错误。通过100101可以知道这个错误是服务 A,数据库模块下的记录没有找到错误。你可能会问:按这种设计,每个模块下最多能注册 100 个错误,是不是有点少?其实在我看来,如果每个模块的错误码超过 100 个,要么说明这个模块太大了,建议拆分;要么说明错误码设计得不合理,共享性差,需要重新设计。
通过Context取得信息
Server端取JWT中的key数据
func getPayloadFromCtx(ctx context.Context, partName string) (string, error) {
	if claims, ok := jwt.FromContext(ctx); ok {
		if m, ok := claims.(jwtV4.MapClaims); ok {
			if v, ok := m[partName].(string); ok {
				return v, nil
			}
		}
	}
	return "", errors.New("invalid Jwt")
}
middleware中,还可以将context转换为http.Transport获取更多的信息。
if tr, ok := transport.FromServerContext(ctx); ok {
    // 可以取header等信息
    if hr, ok := tr.(*http.Transport); ok {
      // 可以取request等信息
   }
}
在Service中设置响应的Header信息
if httpCtx, ok := ctx.(http.Context); ok {
		httpCtx.Response().Header().Set("x-gopher", "czyt")
}
日志脱敏与过滤
需要对日志进行脱敏和过滤,使用 kratos的日志过滤
h := NewHelper(
    NewFilter(logger,
        // 等级过滤
        FilterLevel(log.LevelError),

        // 按key遮蔽
        FilterKey("username"),

        // 按value遮蔽
        FilterValue("hello"),

        // 自定义过滤函数
        FilterFunc(
            func (level Level, keyvals ...interface{}) bool {
                if level == LevelWarn {
                    return true
                }
                for i := 0; i < len(keyvals); i++ {
                    if keyvals[i] == "password" {
                        keyvals[i+1] = fuzzyStr
                    }
                }
                return false
            }
        ),
    ),
)
FilterFunc(f func(level Level, keyvals ...interface{}) bool)使用自定义的函数来对日志进行处理,keyvals里为key和对应的value,按照奇偶进行读取即可
TODO:按奇偶进行读取的意思
一个接口对应多个httpPath
下面是官网的文档中的一个例子(原文):
syntax = "proto3";

package helloworld.v1;

import "google/api/annotations.proto";

option go_package = "github.com/go-kratos/service-layout/api/helloworld/v1;v1";
option java_multiple_files = true;
option java_package = "dev.kratos.api.helloworld.v1";
option java_outer_classname = "HelloWorldProtoV1";

// The greeting service definition.
service Greeter {
  // Sends a greeting
  rpc SayHello (HelloRequest) returns (HelloReply)  {
    option (google.api.http) = {
        // 定义一个 GET 接口,并且把 name 映射到 HelloRequest
        get: "/helloworld/{name}",
        // 可以添加附加接口
        additional_bindings {
            // 定义一个 POST 接口,并且把 body 映射到 HelloRequest
            post: "/v1/greeter/say_hello",
            body: "*",
        }
    };
  }
}

// The request message containing the user's name.
message HelloRequest {
  string name = 1;
}

// The response message containing the greetings
message HelloReply {
  string message = 1;
}
支持QueryString的Post接口
Protobuf定义
rpc CreateUser(CreateUserRequest) returns (CreateUserResponse) {
    option (google.api.http) = {
      post: "/users",
      body: "user"
    };
  }

message CreateUserRequest {
  string password = 1;
  User user = 2;
}
message CreateUserResponse {
  string response = 1;
}

message User {
  string first_name = 1;
  string last_name = 2;
}
在service层代码可以直接取到对应参数
func (s *GreeterService) CreateUser(ctx context.Context, req *v1.CreateUserRequest) (*v1.CreateUserResponse, error) {
	info := fmt.Sprintf("password:%s,userName:%s %s", req.Password, req.User.FirstName, req.User.LastName)
	return &v1.CreateUserResponse{Response: info}, nil
}
调用
curl --location -g --request POST 'http://127.0.0.1:8000/users?password=e77eEDab-BdAe-78BE-0979-2F798d9bBe4b \
--header 'Content-Type: application/json' \
--data-raw '{
    "first_name":"czyt",
    "last_name":"cn"
}'
返回
{
    "response": "password:e77eEDab-BdAe-78BE-0979-2F798d9bBe4b,userName:czyt cn"
}
参考:
-
注意:接口url的定义要注意url覆盖的问题。调整proto中的定义顺序即可。
支持Websocket
ws
下面的代码是官方的例子
main.go
package main

import (
	"log"

	"github.com/go-kratos/examples/ws/handler"
	"github.com/go-kratos/kratos/v2"
	"github.com/go-kratos/kratos/v2/transport/http"
	"github.com/gorilla/mux"
)

func main() {
	router := mux.NewRouter()
	router.HandleFunc("/ws", handler.WsHandler)

	httpSrv := http.NewServer(http.Address(":8080"))
	httpSrv.HandlePrefix("/", router)

	app := kratos.New(
		kratos.Name("ws"),
		kratos.Server(
			httpSrv,
		),
	)
	if err := app.Run(); err != nil {
		log.Println(err)
	}
}
handler.go
package handler

import (
	"log"
	"net/http"

	"github.com/gorilla/websocket"
)

var upgrader = websocket.Upgrader{}

func WsHandler(w http.ResponseWriter, r *http.Request) {
	c, err := upgrader.Upgrade(w, r, nil)
	if err != nil {
		log.Print("upgrade:", err)
		return
	}
	defer c.Close()
	for {
		mt, message, err := c.ReadMessage()
		if err != nil {
			log.Println("read:", err)
			break
		}
		log.Printf("recv: %s", message)
		err = c.WriteMessage(mt, message)
		if err != nil {
			log.Println("write:", err)
			break
		}
	}
}
webSocket工程化方面,我一般是在service层中通过context转换为http.context来传递到useCase层进行
if httpCtx, ok := ctx.(http.Context); ok {
		if req.Id == "" {
			// 处理验证逻辑
		}
		if err := a.wsUc.HandleWebsocket(req.Id, httpCtx); err != nil {
			return nil, err
		}
  }
对应的UseCase代码
upGrader = websocket.Upgrader{
		CheckOrigin: func(r *http.Request) bool {
			return true
		},
}

func HandleWebsocket(id string,httpCtx http.Context) error {
    conn, err := upGrader.Upgrade(ctx.Response(), ctx.Request(), nil)
	if err != nil {
		c.log.Error(err)
		return err
	}
	go handleWsMessage(id, conn)
	return nil
}
wss
webSocket服务如果要支持wss,一般必须监听tls,也就是说你需要相关的域名证书。有两种实现方式:
- 使用autoTls。免费用Let’s Encrypt的证书。这种方式需要强制使用443端口,对于部署了nginx的平台不是很友好。
- 使用证书和证书key。这种方式比较推荐,没有端口强制要求。相关代码后续再进行更新。
另外再说下nginx下配置wss需要注意的几点:
-
proxy_pass 的时候是https的,比如你以前的ws的proxy_pass 是
http://ws/hello那么你的wss的proxy_pass就应该是https://ws/hello -
在https的网站映射下面,对应的是wss,而http对应的是ws。
参考下面的nginx配置:
map $http_upgrade $connection_upgrade {
      default upgrade;
      '' close;
}

upstream tiny_wssserver {
   server 0.0.0.0:8079;
   ip_hash;
}

server {
    listen      80;
    server_name test.czyt.tech;
    location / {
         root /opt/web/home/;
         index  index.html index.htm;

    }

   location /ws {
     proxy_pass https://tiny_wssserver/ws;
     proxy_http_version 1.1;
     proxy_set_header Upgrade $http_upgrade;
     proxy_set_header Connection $connection_upgrade;
     proxy_set_header   Host $host;
     proxy_read_timeout 36000s;
   }
}


server {
    listen       443  ssl;
    server_name  test.czyt.tech;
    client_max_body_size 50m;

    ssl_certificate /opt/certs/certificates/test.czyt.tech.crt;
    ssl_certificate_key /opt/certs/certificates/test.czyt.tech.key;

    location / {
         root /opt/web/home/;
         index  index.html index.htm;

    }

   location /ws {
     proxy_pass https://tiny_wssserver/ws;
     proxy_http_version 1.1;
     proxy_set_header Upgrade $http_upgrade;
     proxy_set_header Connection $connection_upgrade;
     proxy_set_header   Host $host;
     proxy_read_timeout 36000s;
   }
}
支持文件上传
因为protobuf官方限制,并不能通过protobuf生成http服务,需要创建相关逻辑,参考example中的实现:
package main

import (
	"io"
	"log"
	"os"

	"github.com/go-kratos/kratos/v2"
	"github.com/go-kratos/kratos/v2/transport/http"
)

func uploadFile(ctx http.Context) error {
	req := ctx.Request()

	fileName := req.FormValue("name")
	file, handler, err := req.FormFile("file")
	if err != nil {
		return err
	}
	defer file.Close()

	f, err := os.OpenFile(handler.Filename, os.O_WRONLY|os.O_CREATE, 0o666)
	if err != nil {
		return err
	}
	defer f.Close()
	_, _ = io.Copy(f, file)

	return ctx.String(200, "File "+fileName+" Uploaded successfully")
}

func main() {
	httpSrv := http.NewServer(
		http.Address(":8000"),
	)
	route := httpSrv.Route("/")
	route.POST("/upload", uploadFile)

	app := kratos.New(
		kratos.Name("upload"),
		kratos.Server(
			httpSrv,
		),
	)
	if err := app.Run(); err != nil {
		log.Fatal(err)
	}
}
参考 https://freshman.tech/file-upload-golang/
在grpc网关的这个issue,emcfarlane 给出了一个方案,也算提供了一种思路,但kratos不支持stream的rpc生成,暂未测试。
👋 hello, I’ve solved this in my gRPC-transcoding project https://github.com/emcfarlane/larking by letting the handler access the underlying reader/writer stream. The API is:
func AsHTTPBodyReader(stream grpc.ServerStream, msg proto.Message) (io.Reader, error)
func AsHTTPBodyWriter(stream grpc.ServerStream, msg proto.Message) (io.Writer, error)
Which handles asserting the stream is a stream of google.api.HttpBody and correctly unmarshals the first payloads.
So if you have an API like:
import "google/api/httpbody.proto";

service Files {
  rpc LargeUploadDownload(stream UploadFileRequest)
      returns (stream google.api.HttpBody) {
    option (google.api.http) = {
      post : "/files/large/{filename}"
      body : "file"
    };
  }
}
message UploadFileRequest {
  string filename = 1;
  google.api.HttpBody file = 2;
}
You can use the
AsHTTPBodymethods to access the reader and writer of the http request without chunking into streams of messages. Like:// LargeUploadDownload echoes the request body as the response body with contentType. func (s *asHTTPBodyServer) LargeUploadDownload(stream testpb.Files_LargeUploadDownloadServer) error { var req testpb.UploadFileRequest r, _ := larking.AsHTTPBodyReader(stream, &req) log.Printf("got %s!", req.Filename) rsp := httpbody.HttpBody{ ContentType: req.File.GetContentType(), } w, _ := larking.AsHTTPBodyWriter(stream, &rsp) _, err := io.Copy(w, r) return err }
我们可以用下面的方式来优化上面的代码。首先在Service层加入一个方法,它传入一个http.Server ,来添加相应的route信息。然后按原来的方式进行service的初始化,最后在http.Server注入的时候,调用我们刚才申明的方法,添加route信息,再返回http.Server即可。
下面是一个相对规范的工程代码示例(去掉了相关业务代码):
自定义的泛型处理代码
import "github.com/gorilla/schema"

func UploadHandlerWithMiddleware[T comparable](ctx http.Context, fileFormKey string) (
	chain middleware.Middleware,
	request T,
	reader io.Reader,
	filename string,
	err error,
) {
		defer func() {
		if err := recover(); err != nil {
			log.Println("panic handled:", err)
		}
	}()
	if fileFormKey == "" {
		fileFormKey = "file"
	}
	// 读取文件
	file, fileHeader, err := ctx.Request().FormFile(fileFormKey)
	defer file.Close()
	if err != nil {
		return nil, request, nil, "", err
	}
	buf := bufPool.Get()
	defer bufPool.Put(buf)
	if _, err := io.Copy(buf, file); err != nil {
		return nil, request, nil, fileHeader.Filename, err
	}
   // 开始解析Form参数
	if err := ctx.Request().ParseForm(); err != nil {
		return nil, request, nil, "", err
	}
	if err := ctx.Request().ParseMultipartForm(32 << 20); err != nil {
		return nil, request, nil, "", err
	}
    // 如果获取的Form参数不为nil,那么就进行参数到对应类型的解析
	if form := ctx.Request().Form; form != nil {
		var decoder = schema.NewDecoder()
		t := new(T)
		if err := decoder.Decode(t, form); err == nil {
			request = *t
		}
	}
    // 获取这个ctx的middleware执行权,当然也可以在上一步获取
	h := ctx.Middleware
	return h, request, bytes.NewReader(buf.Bytes()), fileHeader.Filename, nil
}
在Service中调用
func (u UploadService) RegisterUploadServiceHttpServer(svr *http.Server) {
	route := svr.Route("/")
	route.POST("/v1/upload/demo", u.uploadDemo)

}

// 上传更新处理逻辑
func (u UploadService) uploadDemo(ctx http.Context) error {
    // 指定Operation 这样可以进行路由白名单设置等操作
	http.SetOperation(ctx, "/upload.v1.UploadService/demo")
	lazyCreator, uploadDemoOpt, reader, filename, err := udhandler.UploadHandlerWithMiddleware[biz.UploadDemoOption](
		ctx,
		"file")
	if err != nil {
		return v1.ErrorInvalidUploadDemoRequest("invalid request:%v", err)
	}
	handler := u.uploadUc.UploadDemo(filename, reader, uploadDemoOpt)
	h := lazyCreator(handler)
	resp, err := h(ctx, uploadDemoOpt)
	if err != nil {
		return v1.ErrorInvalidUploadDemoRequest("invalid request:%v", err)
	}
	return ctx.JSON(200, resp)
}
在useCase的Biz中定义
type UploadDemoOption struct {
	// 文件最大尺寸
	FileMaxSize int64 `schema:"file_max_size"`
	// 无损上传
	UploadWithNoLoss bool ` schema:"upload_with_no_loss"`
}

type UploadDemoResult struct {
	// 文件是否上传成功
	Success bool `json:"success"`
	// 文件下载链接
	FileDownloadUrl string `json:"file_download_url"`
}

func (a UploadUseCase) UploadImage(fileName string, reader io.Reader, uploadDemoOption UploadDemoOption) middleware.Handler {
	return func(ctx context.Context, req interface{}) (interface{}, error) {
        imageUploadResult:=UploadDemoResult{}
        ........
		return imageUploadResult, nil
	}
}
文件下载、导出服务
文件下载服务既可以是本地静态文件也可能是动态生成的,本质上就是将字节返回到客户端。在Kratos中我们可以将这部分逻辑由ResponseEncoder控制,也就是说我们可以先按proto定义服务,但是返回返回文件下载。
proto 定义
import "google/api/field_behavior.proto";
option go_package = "attachment;attachment";

message Attachment {
  string file_name = 1 [json_name = "file_name"];
  int64  content_length = 2 [json_name = "content_length"];
  bytes payload = 3 [(google.api.field_behavior)=REQUIRED];
}
自定义的ResponseEncoder
func CustomResponseEncoder() http.ServerOption {
	return http.ResponseEncoder(func(w http.ResponseWriter, r *http.Request, i any) error {
		if asset, ok := i.(*attachment.Attachment); ok {
			err := handleAttachment(w, asset)
			if err != nil {
				return err
			}
			return nil
		}
		if m, ok := i.(proto.Message); ok {
			 // do other logics here
		}
           .......
	})
}

func handleAttachment(w http.ResponseWriter, attach *attachment.Attachment) error {
	w.Header().Set("Content-Disposition", attach.FileName)
	w.Header().Set("Content-Length", strconv.FormatInt(attach.ContentLength, 10))
	w.Header().Set("Content-Type", "application/octet-stream")
	_, err := w.Write(attach.Payload)
	if err != nil {
		return err
	}
	return nil
}
参考 issue
支持动态内容
实现json.RawMessage
在go中,json.RawMessage适用于延迟解析的场景,比如你定义了一个消息,这个消息有N种类型,那么消息的payload可以使用这种类型。
// RawMessage is a raw encoded JSON value.
// It implements Marshaler and Unmarshaler and can
// be used to delay JSON decoding or precompute a JSON encoding.
type RawMessage []byte
在protobuf中,只需要将字段定义为byte即可
message DeviceMsg{
    int32 msg_type = 1;
    bytes msg_payload = 2;
}
客户端在传递时,只需要将payload base64 encode下,即可。服务端再根据type动态解析。
使用google.protobuf.Struct
也可以将消息定义为google.protobuf.Struct
Structrepresents a structured data value, consisting of fields which map to dynamically typed values. In some languages,Structmight be supported by a native representation. For example, in scripting languages like JS a struct is represented as an object. The details of that representation are described together with the proto support for the language.The JSON representation for
Structis JSON object.
Field name Type Description fieldsmap<string, Value>Map of dynamically typed values.
Todo
参考链接:
静态文件托管
官方例子
package main

import (
	"embed"
	"log"
	"net/http"

	"github.com/go-kratos/kratos/v2"
	transhttp "github.com/go-kratos/kratos/v2/transport/http"
	"github.com/gorilla/mux"
)

//go:embed assets/*
var f embed.FS

func main() {
	router := mux.NewRouter()
	// example: /assets/index.html
	router.PathPrefix("/assets").Handler(http.FileServer(http.FS(f)))

	httpSrv := transhttp.NewServer(transhttp.Address(":8000"))
	httpSrv.HandlePrefix("/", router)

	app := kratos.New(
		kratos.Name("static"),
		kratos.Server(
			httpSrv,
		),
	)
	if err := app.Run(); err != nil {
		log.Fatal(err)
	}
}
自定义路由继承middleware
对于一些从proto不支持的场景,如文件上传等,就需要自定义路由,但是鉴权和认证可能是需要的,这些功能在kratos中是通过middleware来实现的。我们可以通过下面的方式来将middleware同样应用于自定义的路由。(代码未作优化,只是为了演示具体的实现)
func NewHTTPServer(c *conf.Server, greeter *service.GreeterService, logger log.Logger) *http.Server {
	var opts = []http.ServerOption{
		http.Middleware(
			recovery.Recovery(),
			nop.UserAgent(),
		),
	}
	if c.Http.Network != "" {
		opts = append(opts, http.Network(c.Http.Network))
	}
	if c.Http.Addr != "" {
		opts = append(opts, http.Address(c.Http.Addr))
	}
	if c.Http.Timeout != nil {
		opts = append(opts, http.Timeout(c.Http.Timeout.AsDuration()))
	}
	srv := http.NewServer(opts...)
    // 自定义路由,添加一个echo的功能
	route := srv.Route("/")
	route.GET("/v1/echo/{requester}", EchoHandler)
	v1.RegisterGreeterHTTPServer(srv, greeter)
	return srv
}

// 请求体定义
type echoRequest struct {
	Requester string `json:"requester"`
}
// 响应
type echoResponse struct {
	Resp string `json:"resp"`
}

// 消息处理实现逻辑
func echo(ctx context.Context, req *echoRequest) (*echoResponse, error) {
	return &echoResponse{Resp: fmt.Sprintf("hello,%s", req.Requester)}, nil
}

// middware处理
func EchoHandler(ctx http.Context) error {
	var in echoRequest
	if err := ctx.BindQuery(&in); err != nil {
		return err
	}
	if err := ctx.BindVars(&in); err != nil {
		return err
	}
	h := ctx.Middleware(func(ctx context.Context, req interface{}) (interface{}, error) {
		return echo(ctx, req.(*echoRequest))
	})
	resp, err := h(ctx, &in)
	if err != nil {
		return err
	}
	reply := resp.(*echoResponse)
	return ctx.Result(200, reply)
}
middleware代码如下
func UserAgent() middleware.Middleware {
	return func(handler middleware.Handler) middleware.Handler {
		return func(ctx context.Context, req interface{}) (reply interface{}, err error) {
			if tr, ok := transport.FromServerContext(ctx); ok {
				userAgent:=tr.RequestHeader().Get(userAgent)
				if strings.EqualFold(userAgent,"kratos-nb") {
					return nil, errors.New(403, "INVALID-UA", "user agent is invalid")
				}
			}
			return handler(ctx, req)
		}
	}
}
接口幂等性
关于幂等性,下面是GPT4的解释
幂等性是一种在计算机科学和数学中的概念,用来描述一个操作无论执行多少次,其结果都是相同的特性。
在Web API设计中,“幂等性"指的是一个HTTP请求方法无论调用多少次,服务器上的资源状态都不会发生改变。它常用于设计RESTful接口,并且HTTP协议中定义的某些方法(如GET, PUT, DELETE, HEAD, OPTIONS, TRACE)被定义为幂等的。
例如,使用GET方法从服务器上获取资源就是幂等的,不论你调用一次或一百次,服务器上的资源状态都不会发生改变。
同样,使用DELETE方法删除一个资源也是幂等的。第一次调用会删除资源,然后再多次调用对于服务器上的资源状态没有任何影响(因为资源已经在第一次调用时被删除了)。
需要注意的一点是,幂等性并不意味着每次请求的返回结果都一样。例如,第一次DELETE请求可能返回200(成功),而接下来的DELETE请求可能返回404(未找到),因为资源已经在第一次请求时被删除了。
除了上述的Get和DELETE方法,PUT方法也是幂等的。PUT是用来更新资源的,如果你多次发送相同的PUT请求,那么虽然服务器可能会多次执行更新操作,但是资源的最终状态都是一样的。
这与POST方法不同,每次的POST请求都可能导致一个新资源的创建,因此它不是幂等的。
Kratos中,可以参考 https://github.com/go-cinch/layout/blob/dev/internal/server/middleware/idempotent.go 这样在要求幂等性的接口的时候,需要请求一个幂等性的token,用完就失效。
package middleware

import (
	"context"

	"github.com/go-cinch/layout/api/auth"
	"github.com/go-cinch/layout/internal/biz"
	"github.com/go-kratos/kratos/v2/middleware"
	"github.com/go-kratos/kratos/v2/transport"
	kratosHttp "github.com/go-kratos/kratos/v2/transport/http"
)

const (
	WhitelistIdempotentCategory uint32 = 2
)

func Idempotent(authClient auth.AuthClient) middleware.Middleware {
	return func(handler middleware.Handler) middleware.Handler {
		return func(ctx context.Context, req interface{}) (rp interface{}, err error) {
			tr, ok := transport.FromServerContext(ctx)
			if !ok {
				err = biz.ErrIdempotentMissingToken(ctx)
				return
			}
			var method, path string
			switch tr.Kind() {
			case transport.KindHTTP:
				if ht, ok3 := tr.(kratosHttp.Transporter); ok3 {
					method = ht.Request().Method
					path = ht.Request().URL.Path
				}
			}
			// check idempotent blacklist
			whitelist, err := authClient.HasWhitelist(ctx, &auth.HasWhitelistRequest{
				Category: WhitelistIdempotentCategory,
				Permission: &auth.HasWhitelistRequest_CheckPermission{
					Resource: tr.Operation(),
					Method:   method,
					Uri:      path,
				},
			})
			if err != nil {
				return
			}
			if !whitelist.Ok {
				return handler(ctx, req)
			}
			// check idempotent token
			token := tr.RequestHeader().Get("x-idempotent")
			if token == "" {
				err = biz.ErrIdempotentMissingToken(ctx)
				return
			}
			_, err = authClient.CheckIdempotent(ctx, &auth.CheckIdempotentRequest{Token: token})
			if err != nil {
				return
			}
			return handler(ctx, req)
		}
	}
}
- 文档说明 https://go-cinch.github.io/docs/#/base/7.idempotent
- 代码 https://github.com/go-cinch/common/blob/main/idempotent/idempotent.go
重定向
package main

import (
	"context"
	"fmt"
	"log"
	"net/http"

	"github.com/go-kratos/examples/helloworld/helloworld"
	"github.com/go-kratos/kratos/v2"
	"github.com/go-kratos/kratos/v2/errors"
	khttp "github.com/go-kratos/kratos/v2/transport/http"
)

type server struct {
	helloworld.UnimplementedGreeterServer
}

// SayHello implements helloworld.GreeterServer
func (s *server) SayHello(ctx context.Context, in *helloworld.HelloRequest) (*helloworld.HelloReply, error) {
	if in.Name == "error" {
		return nil, errors.BadRequest("custom_error", fmt.Sprintf("invalid argument %s", in.Name))
	}
	if in.Name == "panic" {
		panic("server panic")
	}
	return &helloworld.HelloReply{Message: fmt.Sprintf("Hello %+v", in.Name)}, nil
}

func redirectFilter(next http.Handler) http.Handler {
	return http.HandlerFunc(func(w http.ResponseWriter, r *http.Request) {
		if r.URL.Path == "/helloworld/kratos" {
			http.Redirect(w, r, "https://go-kratos.dev/", http.StatusMovedPermanently)
			return
		}
		next.ServeHTTP(w, r)
	})
}

func main() {
	httpSrv := khttp.NewServer(
		khttp.Address(":8000"),
		khttp.Filter(redirectFilter),
	)
	s := &server{}
	helloworld.RegisterGreeterHTTPServer(httpSrv, s)

	app := kratos.New(
		kratos.Name("cors"),
		kratos.Server(
			httpSrv,
		),
	)
	if err := app.Run(); err != nil {
		log.Fatal(err)
	}
}
在实际的service代码中,可以写成下面这样
imports(
    	"github.com/go-kratos/kratos/v2/transport/http"
	stdHttp "net/http"
)
......
if httpCtx, ok := ctx.(http.Context); ok {
		stdHttp.Redirect(httpCtx.Response(), httpCtx.Request(), targetUrl, stdHttp.StatusMovedPermanently)
	}
......
Service和Biz层的区分
Service 层:协议转换,比如grpc转http 和一些简单的validate。
Biz层:具体的Biz业务,跟协议无关。
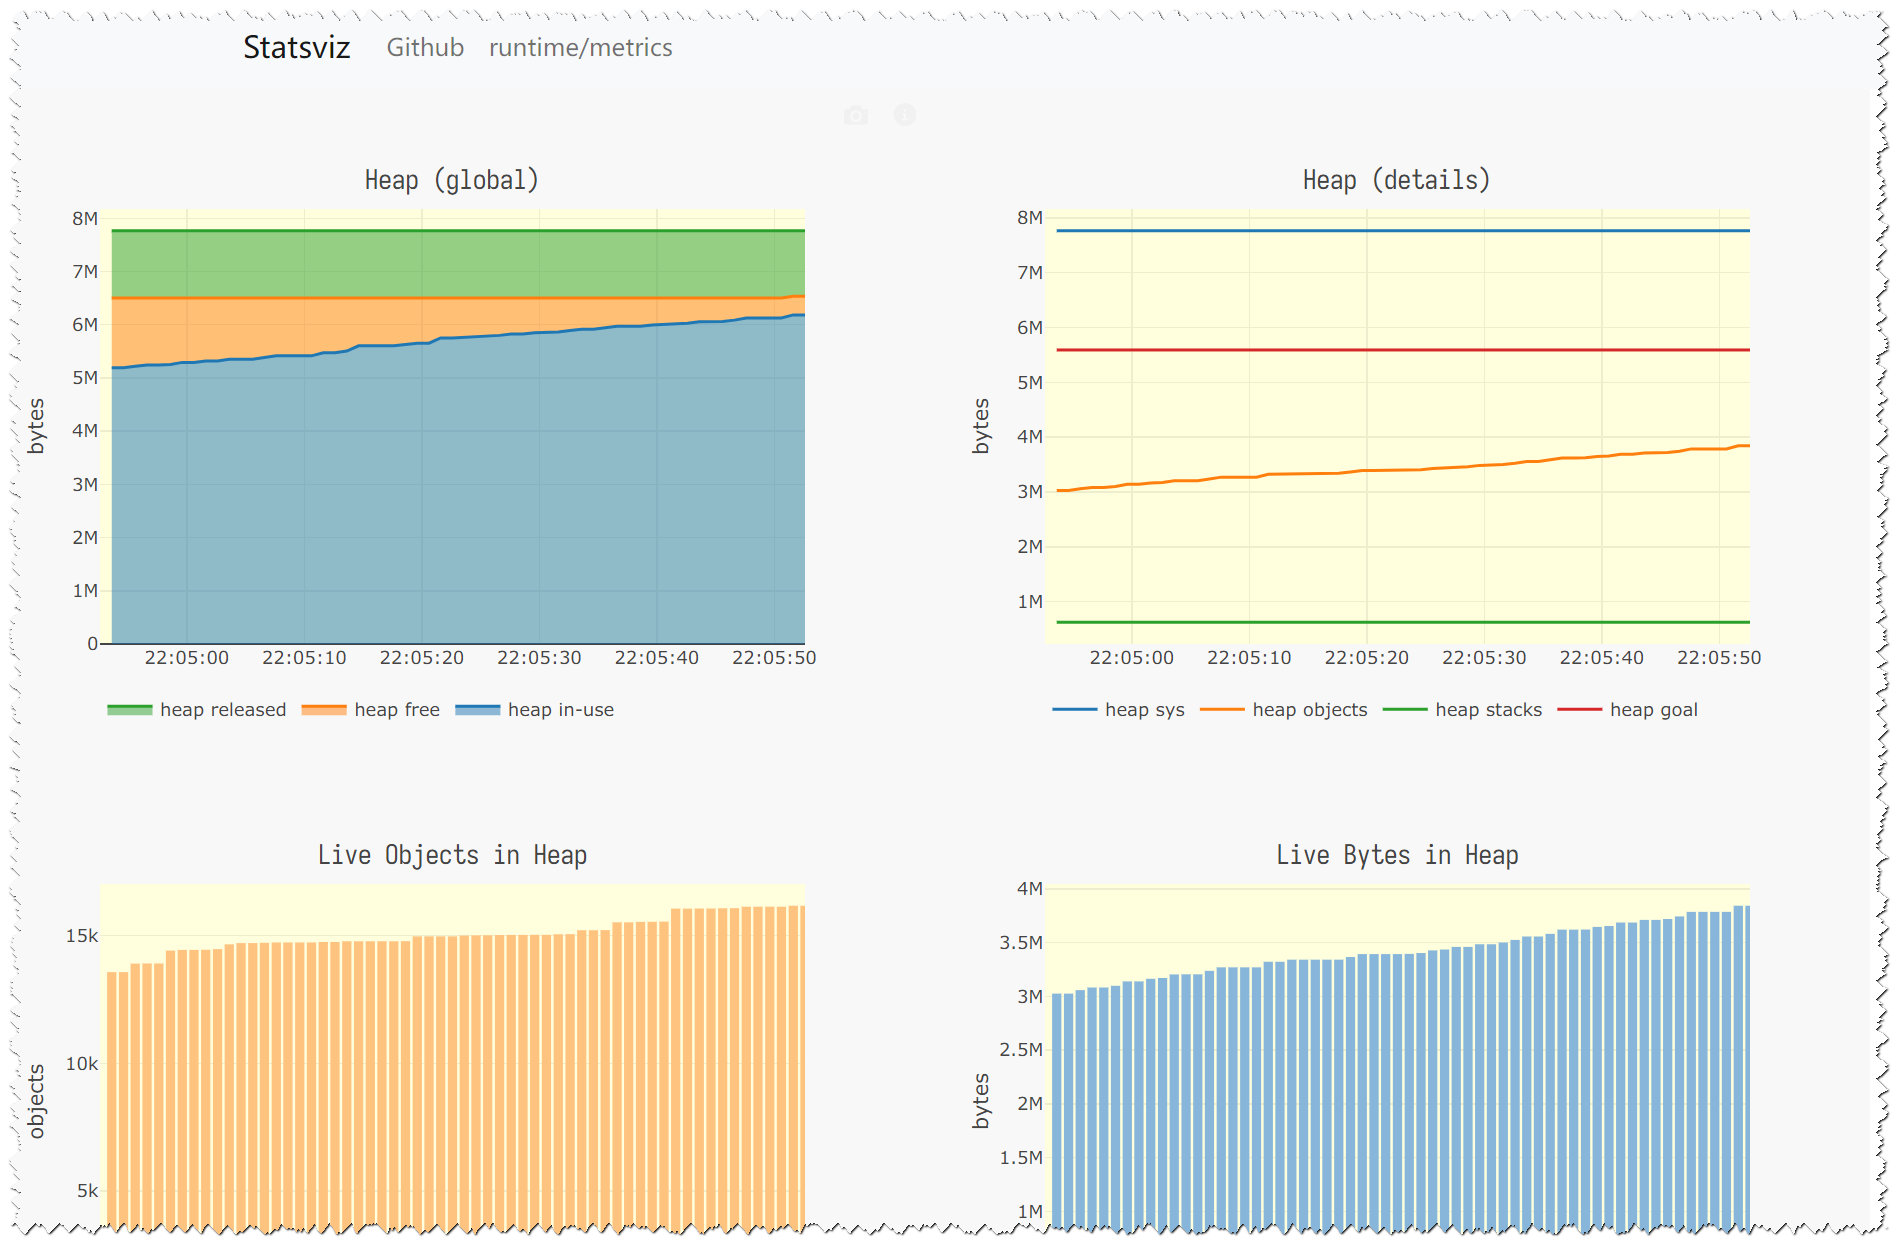
集成实时的metric
statsviz
官方网站说明
Visualise Go program runtime metrics data in real time: heap, objects, goroutines, GC pauses, scheduler, etc. in your browser.
实时可视化Go程序运行时度量数据:在浏览器中的堆、对象、goroutine、GC暂停、调度程序等。
在服务的入口添加下面的代码
imports(
    ....
    "github.com/arl/statsviz"
    ....
)
func newApp(logger log.Logger, gs *grpc.Server, hs *http.Server) *kratos.App {
	statsviz.RegisterDefault()
	....
	}
然后在服务监听地址(默认是http://localhost:8000)后面加上/debug/statsviz/访问即可。
类似的还有:
-
https://github.com/felixge/fgtrace
fgtrace is an experimental profiler/tracer that is capturing wallclock timelines for each goroutine. It’s very similar to the Chrome profiler.
⚠️ fgtrace may cause noticeable stop-the-world pauses in your applications. It is intended for dev and testing environments for now.
其他性能相关库:
服务端跨域配置
参考官方项目
http.Filter(handlers.CORS(
			handlers.AllowedHeaders([]string{"X-Requested-With", "Content-Type", "Authorization"}),// 允许的header
			handlers.AllowedMethods([]string{"GET", "POST", "PUT", "HEAD", "OPTIONS"}),// 允许方法
			handlers.AllowedOrigins([]string{"*"}),//允许的请求源
		)),
需要引用包"github.com/gorilla/handlers"
或者使用rs的包
import "github.com/rs/cors"

http.Filter(CorsHandler()),
........
func CorsHandler() func(handler http.Handler) http.Handler {
	c := cors.New(cors.Options{
		AllowedOrigins:   []string{"*"},
		AllowCredentials: true,
		AllowedHeaders:   allowedHeaders,
		ExposedHeaders:   exposedHeaders,
		AllowedMethods:   allowedMethods,
		// Enable Debugging for testing, consider disabling in production
		Debug: false,
	})
	return func(handler http.Handler) http.Handler {
		return c.Handler(handler)
	}
}
服务https监听开关
在conf.proto 上的Http配置添加下面的内容
import "google/protobuf/wrappers.proto";
message HTTP {
    string network = 1;
    string addr = 2;
    .......
    google.protobuf.BoolValue use_tls_bind = 4;
    google.protobuf.StringValue server_cert_file = 5;
    google.protobuf.StringValue server_cert_key = 6;
  }
然后在http server的代码中添加配置的解析
if c.Http.UseTlsBind != nil {
		if c.Http.UseTlsBind.Value {
			certFilePath := c.Http.ServerCertFile.Value
			certKeyPath := c.Http.ServerCertKey.Value
			if certFilePath != "" && certKeyPath != "" {
				tlsConfig, err := LoadTLSConfig(certFilePath, certKeyPath)
				if err == nil {
					opts = append(opts, http.TLSConfig(tlsConfig))
				}
			}

		}
}

....
// LoadTLSConfig 从文件加载tlsConfig
func LoadTLSConfig(certFilePath string, certKeyFilePath string) (*tls.Config, error) {
	cer, err := tls.LoadX509KeyPair(certFilePath, certKeyFilePath)
	if err != nil {
		return nil, err
	}
	return &tls.Config{
		Certificates: []tls.Certificate{cer},
	}, nil
}
另外可以使用我的autotls插件
自动收集线上问题
Todo
API鉴权
Cerbos
Todo
Ladon
引用自极客时间专栏《Go 语言项目开发实战》,参考ladon的使用示例
Ladon 是用 Go 语言编写的用于实现访问控制策略的库,类似于 RBAC(基于角色的访问控制系统,Role Based Access Control)和 ACL(访问控制列表,Access Control Lists)。但是与 RBAC 和 ACL 相比,Ladon 可以实现更细粒度的访问控制,并且能够在更为复杂的环境中(例如多租户、分布式应用程序和大型组织)工作。Ladon 解决了这个问题:在特定的条件下,谁能够 / 不能够对哪些资源做哪些操作。为了解决这个问题,Ladon 引入了授权策略。授权策略是一个有语法规范的文档,这个文档描述了谁在什么条件下能够对哪些资源做哪些操作。Ladon 可以用请求的上下文,去匹配设置的授权策略,最终判断出当前授权请求是否通过。下面是一个 Ladon 的授权策略样例:
{ "description": "One policy to rule them all.", "subjects": ["users:", "users:maria", "groups:admins"], "actions" : ["delete", ""], "effect": "allow", "resources": [ "resources:articles:<.*>", "resources:printer" ], "conditions": { "remoteIP": { "type": "CIDRCondition", "options": { "cidr": "192.168.0.1/16" } } }}
策略(Policy)由若干元素构成,用来描述授权的具体信息,你可以把它们看成一组规则。核心元素包括主题(Subject)、操作(Action)、效力(Effect)、资源(Resource)以及生效条件(Condition)。元素保留字仅支持小写,它们在描述上没有顺序要求。对于没有特定约束条件的策略,Condition 元素是可选项。一条策略包含下面 6 个元素:
- 主题(Subject),主题名是唯一的,代表一个授权主题。例如,“ken” or “printer-service.mydomain.com”。
- 操作(Action),描述允许或拒绝的操作。效力(Effect),描述策略产生的结果是“允许”还是“拒绝”,包括 allow(允许)和 deny(拒绝)。
- 资源(Resource),描述授权的具体数据。
- 生效条件(Condition),描述策略生效的约束条件。描述(Description),策略的描述。有了授权策略,我们就可以传入请求上下文,由 Ladon 来决定请求是否能通过授权。
参考链接:
OPA(Open Policy Agent)
参考
- OPA Guidebook
- https://www.topaz.sh
- https://www.fugue.co/blog/5-tips-for-using-the-rego-language-for-open-policy-agent-opa
- https://github.com/anderseknert/awesome-opa
集成Casbin
Casbin官网 https://casbin.io
参考代码 https://github.com/go-kratos/examples/tree/main/casbin
需要补充的几点:
-
因为kratos的url生成的是类似于
\api\v1\userInfo\{userid}样式的,所以在policy中需要使用函数keyMatch3来进行policies的匹配,比如我的model.conf文件中就是这样(rbac with domain),如果业务场景中有带pathstring和querystring的情况,就需要讲KeyMatch3 换成Keymatch5来忽略querystring参数。[request_definition] r = sub, dom, obj, act [policy_definition] p = sub, dom, obj, act [role_definition] g = _, _, _ [policy_effect] e = some(where (p.eft == allow)) [matchers] m = g(r.sub, p.sub, r.dom) && r.dom == p.dom && (regexMatch(r.obj , p.obj) || keyMatch3(r.obj , p.obj)) && r.act == p.act官网贴出的casbin支持的函数有下面这些:
函数 参数1 参数2 示例 keyMatch 一个URL 路径,例如 /alice_data/resource1一个URL 路径或 *模式下,例如/alice_data/*keymatch_model.conf/keymatch_policy.csv keyGet 一个URL 路径,例如 /alice_data/resource1一个URL 路径或 *模式下,例如/alice_data/*keyget_model.conf/keymatch_policy.csv keyMatch2 一个URL 路径,例如 /alice_data/resource1一个URL 路径或 :模式下,例如/alice_data/:resourcekeymatch2_model.conf/keymatch2_policy.csv keyGet2 一个URL 路径,例如 /alice_data/resource1一个URL 路径或 :模式下,例如/alice_data/:resourcekeyget_model.conf/keymatch_policy.csv keyMatch3 一个URL 路径,例如 /alice_data/resource1一个URL 路径或 {}模式下,例如/alice_data/{resource}https://github.com/casbin/casbin/blob/277c1a2b85698272f764d71a94d2595a8d425915/util/builtin_operators_test.go#L171-L196 keyMatch4 一个URL 路径,例如 /alice_data/resource1一个URL 路径或 {}模式下,例如/alice_data//{id}/book/{id}https://github.com/casbin/casbin/blob/277c1a2b85698272f764d71a94d2595a8d425915/util/builtin_operators_test.go#L208-L222 keyMatch5 "” matches “/foo/bar” /foo/bar?status=1&type=2 https://github.com/casbin/casbin/blob/6c771f6f35836bf42fedec7fef1c3c0045031c63/util/builtin_operators.go#L280 regexMatch 任意字符串 正则表达式模式 keymatch_model.conf/keymatch_policy.csv ipMatch 一个 IP 地址,例如 192.168.2.123一个 IP 地址或一个 CIDR ,例如 192.168.2.0/24ipmatch_model.conf/ipmatch_policy.csv globMatch 类似路径的 /alice_data/resource1一个全局模式,例如 /alice_data/* -
kratos支持除rbac之外的,还有其他的模型。如rabac with domain等等。参考官网。
-
中间件中取得当前访问的url
if header, ok := transport.FromServerContext(ctx); ok { // 断言成HTTP的Transport可以拿到特殊信息 if hr, ok := header.(*http.Transport); ok { su.Method = hr.Request().Method su.Path = hr.Request().RequestURI } } -
另外一个就是casbin policy的即时刷新问题,可以通过实现watcher接口来实现,下面是一个基于channel的实现。
/*
 * Copyright (c) 2023.czyt  All rights reserved.
 * Author:czyt
 */

package watcher

import (
	"github.com/casbin/casbin/v2/persist"
	"time"
)

var _ persist.Watcher = (*Watcher)(nil)

type Watcher struct {
	callback func(string)
	notify   chan struct{}
	closed   chan struct{}
}

func NewWatcher() *Watcher {
	notify := make(chan struct{}, 1)
	closed := make(chan struct{})
	return &Watcher{
		notify: notify,
		closed: closed,
	}
}

func (w Watcher) SetUpdateCallback(fn func(string)) error {
	w.callback = fn
	go processNotify(w.notify, w.closed, fn)
	return nil
}

func (w Watcher) Update() error {
	w.notify <- struct{}{}
	return nil
}

func (w Watcher) Close() {
	w.closed <- struct{}{}
}

func processNotify(notify, closed chan struct{}, callback func(s string)) {
	for {
		select {
		case _, ok := <-notify:
			if !ok {
				break
			}
			callback("callback called ")
			time.Sleep(2 * time.Second)

		case <-closed:
			close(notify)
			break
		}
	}
}
在初始化casbin中间件选项时注入,同时在data层也注入,这样就可以实现更新规则后,中间件规则刷新。
import "github.com/czyt/kasbin"

casbinM.Server(
	casbinM.WithModel(m),
	casbinM.WithPolicy(a),
	casbinM.WithWatcher(watcher),
	casbinM.WithEnforcerContextCreator(authz.NewSecurityUser()),
),
用户UseCase
func (i InitializationUseCase) createCasbinPolicies(roles []*Role) error {
		defer func(watcher *watcher.Watcher) {
			err := watcher.Update()
			if err != nil {
				i.log.Error("watcher update casbin policy", err)
			}
		}(i.watcher)
        ......
    }
参考
- https://github.com/Permify/permify
- https://github.com/open-policy-agent/opa
- https://github.com/go-cinch/auth
复用proto
在业务中可能需要根据职责划分多个服务,这些服务可能部分proto结构是需要复用的。
-
proto单独放在一个repo,使用protoc生成go文件并发布包(业务不敏感情况下,推荐)。
-
proto放在项目api目录内,使用protoc生成go文件并通过go replace做go mod的替换。go mod发布建议发布proto的顶层目录,下面按版本进行管理,这样后面也较为容易维护。
xxxx.tech/api v0.0.0
replace (
	xxxx.tech/api v0.0.0 => ./api/xxxx/api
)
使用buf
下面的buf配置文件使用了tx7do 这个仓库的配置
根目录的buf.yaml
version: v1
breaking:
  use:
    - FILE
lint:
  use:
    - DEFAULT
api目录下的buf.yaml
version: v1
build:
  excludes: [third_party]
deps:
  - buf.build/googleapis/googleapis
  - buf.build/envoyproxy/protoc-gen-validate
  - buf.build/kratos/apis
  - buf.build/tx7do/gnostic
  - buf.build/gogo/protobuf
breaking:
  use:
    - FILE
lint:
  use:
    - DEFAULT
buf.work.yaml
version: v1
directories:
  - api
buf.gen.yaml
version: v1
managed:
  enabled: false
plugins:
  # generate go struct code
  #- plugin: buf.build/protocolbuffers/go
  - name: go
    out: gen/api/go
    opt: paths=source_relative

  # generate grpc service code
  #- plugin: buf.build/grpc/go
  - name: go-grpc
    out: gen/api/go
    opt:
      - paths=source_relative

  # generate rest service code
  - name: go-http
    out: gen/api/go
    opt:
      - paths=source_relative

  # generate kratos errors code
  - name: go-errors
    out: gen/api/go
    opt:
      - paths=source_relative

  # generate message validator code
  #- plugin: buf.build/bufbuild/validate-go
  - name: validate
    out: gen/api/go
    opt:
      - paths=source_relative
      - lang=go
也可以参考Kratos Example 项目的buf配置,这样生成的go文件和proto定义都在一个目录
buf.gen.yaml
version: v1
plugins:
  # Use protoc-gen-go at v1.28.1
  - plugin: buf.build/protocolbuffers/go:v1.28.1
    out: api
    opt: paths=source_relative
  # Use the latest version of protoc-gen-go-grpc
  - plugin: buf.build/grpc/go
    out: api
    opt:
      - paths=source_relative
      - require_unimplemented_servers=false
  - plugin: go-http
    out: api
    opt:
      - paths=source_relative
  - plugin: openapi
    out: api
    opt:
      - paths=source_relative
  # Use the latest version of protoc-gen-validate
  - plugin:  buf.build/bufbuild/validate-go
    out: api
    opt:
      - paths=source_relative
  - plugin: go-errors
    out: api
    opt:
      - paths=source_relative
系统初始化任务
逻辑抽象
初始化的逻辑,简单抽象为是否初始化判断和初始化,可以使用下面的流程图来表示
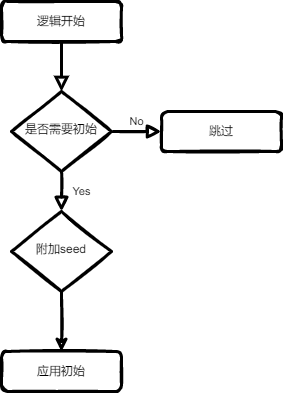
接口简化为下面的代码
type processor interface {
	// IsInit 是否需要初始化
	IsInit() bool
	// Apply 初始化数据
	Apply(seeds []interface{}) error
    // LoadSeeds 获取seeds
    LoadSeeds()(seeds []interface{}, err error)
}
参数注入
kratos 3.5.3 添加了BeforeStart、 BeforeStop、 AfterStart、 AfterStop四个Option,我们可以通过这些来进行参数注入。
hs := http.NewServer()
	gs := grpc.NewServer()
	app := New(
		Name("kratos"),
		Version("v1.0.0"),
		Server(hs, gs),
		BeforeStart(func(_ context.Context) error {
			t.Log("BeforeStart...")
			return nil
		}),
		BeforeStop(func(_ context.Context) error {
			t.Log("BeforeStop...")
			return nil
		}),
		AfterStart(func(_ context.Context) error {
			t.Log("AfterStart...")
			return nil
		}),
		AfterStop(func(_ context.Context) error {
			t.Log("AfterStop...")
			return nil
		}),
		Registrar(&mockRegistry{service: make(map[string]*registry.ServiceInstance)}),
	)
	time.AfterFunc(time.Second, func() {
		_ = app.Stop()
	})
	if err := app.Run(); err != nil {
		t.Fatal(err)
	}
任务间的依赖处理
如果多个任务之间存在依赖关系,那么能否简单实现任务的自动重排么。答案是肯定的,首先,我们要实现任务的编号,编号必须是可以比较的。然后我们还要显式得提供一个接口,可以获取任务依赖的id列表。我们需要调整我们之前的接口,添加下面两个方法:
type processor interface {
	// IsInit 是否需要初始化
	IsInit() bool
	// Apply 初始化数据
	Apply(seeds []interface{}) error
    // LoadSeeds 获取seeds
    LoadSeeds()(seeds []interface{}, err error)
    // GetJobId 获取任务序号
    GetJobId() int
    // GetDepends 获取依赖的序列号
    GetDepends()[]int
}
然后添加了多个processor后,就可以通过slice.sort进行任务重排。
Validate配置说明
工具安装配置
需要安装的包
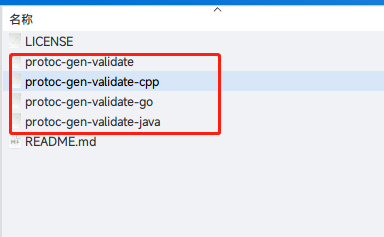
https://github.com/bufbuild/protoc-gen-validate/releases
字节跳动也开源了一个版本 Github仓库为 https://github.com/cloudwego/protoc-gen-validator
然后修改makefile中的api任务
.PHONY: api
# generate api proto
api:
	protoc --proto_path=./api \
	       --proto_path=./third_party \
 	       --go_out=paths=source_relative:./api \
 	       --go-http_out=paths=source_relative:./api \
 	       --go-grpc_out=paths=source_relative:./api \
 	       --validate_out=paths=source_relative,lang=go:./api \
	       --openapi_out=fq_schema_naming=true,default_response=false:. \
	       $(API_PROTO_FILES)
生成以后,就可以通过调用类型的ValidateAll和Validate方法进行校验,或者使用kratos的validate中间件,参考官方文档.
校验语法
Numerics
All numeric types (
float,double,int32,int64,uint32,uint64,sint32,sint64,fixed32,fixed64,sfixed32,sfixed64) share the same rules.
-
const: the field must be exactly the specified value.
// x must equal 1.23 exactly float x = 1 [(validate.rules).float.const = 1.23]; -
lt/lte/gt/gte: these inequalities (
<,<=,>,>=, respectively) allow for deriving ranges in which the field must reside.// x must be less than 10 int32 x = 1 [(validate.rules).int32.lt = 10]; // x must be greater than or equal to 20 uint64 x = 1 [(validate.rules).uint64.gte = 20]; // x must be in the range [30, 40) fixed32 x = 1 [(validate.rules).fixed32 = {gte:30, lt: 40}];Inverting the values of
lt(e)andgt(e)is valid and creates an exclusive range.// x must be outside the range [30, 40) double x = 1 [(validate.rules).double = {lt:30, gte:40}]; -
in/not_in: these two rules permit specifying allow/denylists for the values of a field.
// x must be either 1, 2, or 3 uint32 x = 1 [(validate.rules).uint32 = {in: [1,2,3]}]; // x cannot be 0 nor 0.99 float x = 1 [(validate.rules).float = {not_in: [0, 0.99]}]; -
ignore_empty: this rule specifies that if field is empty or set to the default value, to ignore any validation rules. These are typically useful where being able to unset a field in an update request, or to skip validation for optional fields where switching to WKTs is not feasible.
unint32 x = 1 [(validate.rules).uint32 = {ignore_empty: true, gte: 200}];
Bools
-
const: the field must be exactly the specified value.
// x must be set to true
bool x = 1 [(validate.rules).bool.const = true];

// x cannot be set to true
bool x = 1 [(validate.rules).bool.const = false];
Strings
-
const: the field must be exactly the specified value.
// x must be set to "foo" string x = 1 [(validate.rules).string.const = "foo"]; -
len/min_len/max_len: these rules constrain the number of characters ( Unicode code points) in the field. Note that the number of characters may differ from the number of bytes in the string. The string is considered as-is, and does not normalize.
// x must be exactly 5 characters long string x = 1 [(validate.rules).string.len = 5]; // x must be at least 3 characters long string x = 1 [(validate.rules).string.min_len = 3]; // x must be between 5 and 10 characters, inclusive string x = 1 [(validate.rules).string = {min_len: 5, max_len: 10}]; -
min_bytes/max_bytes: these rules constrain the number of bytes in the field.
// x must be at most 15 bytes long string x = 1 [(validate.rules).string.max_bytes = 15]; // x must be between 128 and 1024 bytes long string x = 1 [(validate.rules).string = {min_bytes: 128, max_bytes: 1024}]; -
pattern: the field must match the specified RE2-compliant regular expression. The included expression should elide any delimiters (ie,
/\d+/should just be\d+).// x must be a non-empty, case-insensitive hexadecimal string string x = 1 [(validate.rules).string.pattern = "(?i)^[0-9a-f]+$"]; -
prefix/suffix/contains/not_contains: the field must contain the specified substring in an optionally explicit location, or not contain the specified substring.
// x must begin with "foo" string x = 1 [(validate.rules).string.prefix = "foo"]; // x must end with "bar" string x = 1 [(validate.rules).string.suffix = "bar"]; // x must contain "baz" anywhere inside it string x = 1 [(validate.rules).string.contains = "baz"]; // x cannot contain "baz" anywhere inside it string x = 1 [(validate.rules).string.not_contains = "baz"]; // x must begin with "fizz" and end with "buzz" string x = 1 [(validate.rules).string = {prefix: "fizz", suffix: "buzz"}]; // x must end with ".proto" and be less than 64 characters string x = 1 [(validate.rules).string = {suffix: ".proto", max_len:64}]; -
in/not_in: these two rules permit specifying allow/denylists for the values of a field.
// x must be either "foo", "bar", or "baz" string x = 1 [(validate.rules).string = {in: ["foo", "bar", "baz"]}]; // x cannot be "fizz" nor "buzz" string x = 1 [(validate.rules).string = {not_in: ["fizz", "buzz"]}]; -
ignore_empty: this rule specifies that if field is empty or set to the default value, to ignore any validation rules. These are typically useful where being able to unset a field in an update request, or to skip validation for optional fields where switching to WKTs is not feasible.
string CountryCode = 1 [(validate.rules).string = {ignore_empty: true, len: 2}]; -
well-known formats: these rules provide advanced constraints for common string patterns. These constraints will typically be more permissive and performant than equivalent regular expression patterns, while providing more explanatory failure descriptions.
// x must be a valid email address (via RFC 5322)
string x = 1 [(validate.rules).string.email = true];

// x must be a valid address (IP or Hostname).
string x = 1 [(validate.rules).string.address = true];

// x must be a valid hostname (via RFC 1034)
string x = 1 [(validate.rules).string.hostname = true];

// x must be a valid IP address (either v4 or v6)
string x = 1 [(validate.rules).string.ip = true];

// x must be a valid IPv4 address
// eg: "192.168.0.1"
string x = 1 [(validate.rules).string.ipv4 = true];

// x must be a valid IPv6 address
// eg: "fe80::3"
string x = 1 [(validate.rules).string.ipv6 = true];

// x must be a valid absolute URI (via RFC 3986)
string x = 1 [(validate.rules).string.uri = true];

// x must be a valid URI reference (either absolute or relative)
string x = 1 [(validate.rules).string.uri_ref = true];

// x must be a valid UUID (via RFC 4122)
string x = 1 [(validate.rules).string.uuid = true];

// x must conform to a well known regex for HTTP header names (via RFC 7230)
string x = 1 [(validate.rules).string.well_known_regex = HTTP_HEADER_NAME]

// x must conform to a well known regex for HTTP header values (via RFC 7230)
string x = 1 [(validate.rules).string.well_known_regex = HTTP_HEADER_VALUE];

// x must conform to a well known regex for headers, disallowing \r\n\0 characters.
string x = 1 [(validate.rules).string {well_known_regex: HTTP_HEADER_VALUE, strict: false}];
Bytes
Literal values should be expressed with strings, using escaping where necessary.
-
const: the field must be exactly the specified value.
// x must be set to "foo" ("\x66\x6f\x6f") bytes x = 1 [(validate.rules).bytes.const = "foo"]; // x must be set to "\xf0\x90\x28\xbc" bytes x = 1 [(validate.rules).bytes.const = "\xf0\x90\x28\xbc"]; -
len/min_len/max_len: these rules constrain the number of bytes in the field.
// x must be exactly 3 bytes bytes x = 1 [(validate.rules).bytes.len = 3]; // x must be at least 3 bytes long bytes x = 1 [(validate.rules).bytes.min_len = 3]; // x must be between 5 and 10 bytes, inclusive bytes x = 1 [(validate.rules).bytes = {min_len: 5, max_len: 10}]; -
pattern: the field must match the specified RE2-compliant regular expression. The included expression should elide any delimiters (ie,
/\d+/should just be\d+).// x must be a non-empty, ASCII byte sequence bytes x = 1 [(validate.rules).bytes.pattern = "^[\x00-\x7F]+$"]; -
prefix/suffix/contains: the field must contain the specified byte sequence in an optionally explicit location.
// x must begin with "\x99" bytes x = 1 [(validate.rules).bytes.prefix = "\x99"]; // x must end with "buz\x7a" bytes x = 1 [(validate.rules).bytes.suffix = "buz\x7a"]; // x must contain "baz" anywhere inside it bytes x = 1 [(validate.rules).bytes.contains = "baz"]; -
in/not_in: these two rules permit specifying allow/denylists for the values of a field.
// x must be either "foo", "bar", or "baz" bytes x = 1 [(validate.rules).bytes = {in: ["foo", "bar", "baz"]}]; // x cannot be "fizz" nor "buzz" bytes x = 1 [(validate.rules).bytes = {not_in: ["fizz", "buzz"]}]; -
ignore_empty: this rule specifies that if field is empty or set to the default value, to ignore any validation rules. These are typically useful where being able to unset a field in an update request, or to skip validation for optional fields where switching to WKTs is not feasible.
bytes x = 1 [(validate.rules).bytes = {ignore_empty: true, in: ["foo", "bar", "baz"]}]; -
well-known formats: these rules provide advanced constraints for common patterns. These constraints will typically be more permissive and performant than equivalent regular expression patterns, while providing more explanatory failure descriptions.
// x must be a valid IP address (either v4 or v6) in byte format
bytes x = 1 [(validate.rules).bytes.ip = true];

// x must be a valid IPv4 address in byte format
// eg: "\xC0\xA8\x00\x01"
bytes x = 1 [(validate.rules).bytes.ipv4 = true];

// x must be a valid IPv6 address in byte format
// eg: "\x20\x01\x0D\xB8\x85\xA3\x00\x00\x00\x00\x8A\x2E\x03\x70\x73\x34"
bytes x = 1 [(validate.rules).bytes.ipv6 = true];
Enums
All literal values should use the numeric (int32) value as defined in the enum descriptor.
The following examples use this State enum
enum State {
  INACTIVE = 0;
  PENDING = 1;
  ACTIVE = 2;
}
-
const: the field must be exactly the specified value.
// x must be set to ACTIVE (2) State x = 1 [(validate.rules).enum.const = 2]; -
defined_only: the field must be one of the specified values in the enum descriptor.
// x can only be INACTIVE, PENDING, or ACTIVE State x = 1 [(validate.rules).enum.defined_only = true]; -
in/not_in: these two rules permit specifying allow/denylists for the values of a field.
// x must be either INACTIVE (0) or ACTIVE (2)
State x = 1 [(validate.rules).enum = {in: [0,2]}];

// x cannot be PENDING (1)
State x = 1 [(validate.rules).enum = {not_in: [1]}];
Messages
If a field contains a message and the message has been generated with PGV, validation will be performed recursively. Message’s not generated with PGV are skipped.
// if Person was generated with PGV and x is set,
// x's fields will be validated.
    Person x = 1;
-
skip: this rule specifies that the validation rules of this field should not be evaluated.
// The fields on Person x will not be validated. Person x = 1 [(validate.rules).message.skip = true]; -
required: this rule specifies that the field cannot be unset.
// x cannot be unset
Person x = 1 [(validate.rules).message.required = true];

// x cannot be unset, but the validations on x will not be performed
Person x = 1 [(validate.rules).message = {required: true, skip: true}];
Repeated
-
min_items/max_items: these rules control how many elements are contained in the field
// x must contain at least 3 elements repeated int32 x = 1 [(validate.rules).repeated.min_items = 3]; // x must contain between 5 and 10 Persons, inclusive repeated Person x = 1 [(validate.rules).repeated = {min_items: 5, max_items: 10}]; // x must contain exactly 7 elements repeated double x = 1 [(validate.rules).repeated = {min_items: 7, max_items: 7}]; -
unique: this rule requires that all elements in the field must be unique. This rule does not support repeated messages.
// x must contain unique int64 values repeated int64 x = 1 [(validate.rules).repeated.unique = true]; -
items: this rule specifies constraints that should be applied to each element in the field. Repeated message fields also have their validation rules applied unless
skipis specified on this constraint.// x must contain positive float values repeated float x = 1 [(validate.rules).repeated.items.float.gt = 0]; // x must contain Persons but don't validate them repeated Person x = 1 [(validate.rules).repeated.items.message.skip = true]; -
ignore_empty: this rule specifies that if field is empty or set to the default value, to ignore any validation rules. These are typically useful where being able to unset a field in an update request, or to skip validation for optional fields where switching to WKTs is not feasible.
repeated int64 x = 1 [(validate.rules).repeated = {ignore_empty: true, items: {int64: {gt: 200}}}];
Maps
-
min_pairs/max_pairs: these rules control how many KV pairs are contained in this field
// x must contain at least 3 KV pairs map<string, uint64> x = 1 [(validate.rules).map.min_pairs = 3]; // x must contain between 5 and 10 KV pairs map<string, string> x = 1 [(validate.rules).map = {min_pairs: 5, max_pairs: 10}]; // x must contain exactly 7 KV pairs map<string, Person> x = 1 [(validate.rules).map = {min_pairs: 7, max_pairs: 7}]; -
no_sparse: for map fields with message values, setting this rule to true disallows keys with unset values.
// all values in x must be set map<uint64, Person> x = 1 [(validate.rules).map.no_sparse = true]; -
keys: this rule specifies constraints that are applied to the keys in the field.
// x's keys must all be negative <sint32, string> x = [(validate.rules).map.keys.sint32.lt = 0]; -
values: this rule specifies constraints that are be applied to each value in the field. Repeated message fields also have their validation rules applied unless
skipis specified on this constraint.// x must contain strings of at least 3 characters map<string, string> x = 1 [(validate.rules).map.values.string.min_len = 3]; // x must contain Persons but doesn't validate them map<string, Person> x = 1 [(validate.rules).map.values.message.skip = true]; -
ignore_empty: this rule specifies that if field is empty or set to the default value, to ignore any validation rules. These are typically useful where being able to unset a field in an update request, or to skip validation for optional fields where switching to WKTs is not feasible.
map<string, string> x = 1 [(validate.rules).map = {ignore_empty: true, values: {string: {min_len: 3}}}];
Well-Known Types (WKTs)
A set of WKTs are packaged with protoc and common message patterns useful in many domains.
Scalar Value Wrappers
In the proto3 syntax, there is no way of distinguishing between unset and the zero value of a scalar field. The value WKTs permit this differentiation by wrapping them in a message. PGV permits using the same scalar rules that the wrapper encapsulates.
// if it is set, x must be greater than 3
    google.protobuf.Int32Value x = 1 [(validate.rules).int32.gt = 3];
Message Rules can also be used with scalar Well-Known Types (WKTs):
// Ensures that if a value is not set for age, it would not pass the validation despite its zero value being 0.
message X {google.protobuf.Int32Value age = 1 [(validate.rules).int32.gt = -1, (validate.rules).message.required = true];}
Anys
-
required: this rule specifies that the field must be set
// x cannot be unset google.protobuf.Any x = 1 [(validate.rules).any.required = true]; -
in/not_in: these two rules permit specifying allow/denylists for the
type_urlvalue in this field. Consider using aoneofunion instead ofinif possible.// x must not be the Duration or Timestamp WKT google.protobuf.Any x = 1 [(validate.rules).any = {not_in: [ "type.googleapis.com/google.protobuf.Duration", "type.googleapis.com/google.protobuf.Timestamp" ]}];
Durations
-
required: this rule specifies that the field must be set
// x cannot be unset google.protobuf.Duration x = 1 [(validate.rules).duration.required = true]; -
const: the field must be exactly the specified value.
// x must equal 1.5s exactly google.protobuf.Duration x = 1 [(validate.rules).duration.const = { seconds: 1, nanos: 500000000 }]; -
lt/lte/gt/gte: these inequalities (
<,<=,>,>=, respectively) allow for deriving ranges in which the field must reside.// x must be less than 10s google.protobuf.Duration x = 1 [(validate.rules).duration.lt.seconds = 10]; // x must be greater than or equal to 20ns google.protobuf.Duration x = 1 [(validate.rules).duration.gte.nanos = 20]; // x must be in the range [0s, 1s) google.protobuf.Duration x = 1 [(validate.rules).duration = { gte: {}, lt: {seconds: 1} }];Inverting the values of
lt(e)andgt(e)is valid and creates an exclusive range.// x must be outside the range [0s, 1s) google.protobuf.Duration x = 1 [(validate.rules).duration = { lt: {}, gte: {seconds: 1} }]; -
in/not_in: these two rules permit specifying allow/denylists for the values of a field.
// x must be either 0s or 1s
google.protobuf.Duration x = 1 [(validate.rules).duration = {in: [
    {},
    {seconds: 1}
  ]}];

// x cannot be 20s nor 500ns
google.protobuf.Duration x = 1 [(validate.rules).duration = {not_in: [
    {seconds: 20},
    {nanos: 500}
  ]}];
Timestamps
-
required: this rule specifies that the field must be set
// x cannot be unset google.protobuf.Timestamp x = 1 [(validate.rules).timestamp.required = true]; -
const: the field must be exactly the specified value.
// x must equal 2009/11/10T23:00:00.500Z exactly google.protobuf.Timestamp x = 1 [(validate.rules).timestamp.const = { seconds: 63393490800, nanos: 500000000 }]; -
lt/lte/gt/gte: these inequalities (
<,<=,>,>=, respectively) allow for deriving ranges in which the field must reside.// x must be less than the Unix Epoch google.protobuf.Timestamp x = 1 [(validate.rules).timestamp.lt.seconds = 0]; // x must be greater than or equal to 2009/11/10T23:00:00Z google.protobuf.Timestamp x = 1 [(validate.rules).timestamp.gte.seconds = 63393490800]; // x must be in the range [epoch, 2009/11/10T23:00:00Z) google.protobuf.Timestamp x = 1 [(validate.rules).timestamp = { gte: {}, lt: {seconds: 63393490800} }];Inverting the values of
lt(e)andgt(e)is valid and creates an exclusive range.// x must be outside the range [epoch, 2009/11/10T23:00:00Z) google.protobuf.Timestamp x = 1 [(validate.rules).timestamp = { lt: {}, gte: {seconds: 63393490800} }]; -
lt_now/gt_now: these inequalities allow for ranges relative to the current time. These rules cannot be used with the absolute rules above.
// x must be less than the current timestamp google.protobuf.Timestamp x = 1 [(validate.rules).timestamp.lt_now = true]; -
within: this rule specifies that the field’s value should be within a duration of the current time. This rule can be used in conjunction with
lt_nowandgt_nowto control those ranges.// x must be within ±1s of the current time google.protobuf.Timestamp x = 1 [(validate.rules).timestamp.within.seconds = 1]; // x must be within the range (now, now+1h) google.protobuf.Timestamp x = 1 [(validate.rules).timestamp = { gt_now: true, within: {seconds: 3600} }];
Message-Global
-
disabled: All validation rules for the fields on a message can be nullified, including any message fields that support validation themselves.
message Person { option (validate.disabled) = true; // x will not be required to be greater than 123 uint64 x = 1 [(validate.rules).uint64.gt = 123]; // y's fields will not be validated Person y = 2; } -
ignored: Don’t generate a validate method or any related validation code for this message.
message Person {
  option (validate.ignored) = true;

  // x will not be required to be greater than 123
  uint64 x = 1 [(validate.rules).uint64.gt = 123];

  // y's fields will not be validated
  Person y = 2;
}
OneOfs
-
required: require that one of the fields in a
oneofmust be set. By default, none or one of the unioned fields can be set. Enabling this rules disallows having all of them unset.oneof id { // either x, y, or z must be set. option (validate.required) = true; string x = 1; int32 y = 2; Person z = 3; }
validate在使用中的问题
在部分更新场景下对全部字段校验的问题
对于常规的场景,validate是没有问题的,但是对于部分更新的场景,validate可能会导致问题,我们在做部分更新的时候,可能配合fieldmask进行部分字段更新,但是validate会校验所有字段,导致更新失败。官方repo有人提了一个PR,但尚未合并,在官方未支持这个feature前,只能通过白名单方式来跳过vilidate中间件。
非protoc方式的validate
可以考虑使用非proto方式的validate,这部分代码是摘自项目kratos-base-project
biz/administrator.go
type Administrator struct {
	Id            int64
	Username      string `validate:"required,max=50" label:"用户名"`
	Password      string `validate:"required,max=50" label:"密码"`
	Salt          string
	Mobile        string `validate:"required,max=20" label:"手机号码"`
	Nickname      string `validate:"required,max=50" label:"昵称"`
	Avatar        string `validate:"required,max=150" label:"头像地址"`
	Status        int64  `validate:"required,oneof=1 2" label:"状态"`
	Role          string
	LastLoginTime string
	LastLoginIp   string
	CreatedAt     string
	UpdatedAt     string
	DeletedAt     string
}

func (uc *AdministratorUseCase) Create(ctx context.Context, data *Administrator) (*Administrator, error) {
	err := validate.ValidateStructCN(data)
	if err != nil {
		return &Administrator{}, errors.New(http.StatusBadRequest, errResponse.ReasonParamsError, err.Error())
	}
	return uc.repo.CreateAdministrator(ctx, data)
}
对应的helper方法
vilidate.go
package validate

import (
	"errors"
	"github.com/go-playground/validator/v10"
	"reflect"

	"github.com/go-playground/locales/zh"
	ut "github.com/go-playground/universal-translator"
	zh_translations "github.com/go-playground/validator/v10/translations/zh"
)

// ValidateStruct Struct label数据验证器
func ValidateStruct(model interface{}) error {
	//验证
	validate := validator.New()

	//注册一个函数,获取struct tag里自定义的label作为字段名
	validate.RegisterTagNameFunc(func(fld reflect.StructField) string {
		name := fld.Tag.Get("label")
		return name
	})

	err := validate.Struct(model)
	if err != nil {
		for _, err := range err.(validator.ValidationErrors) {
			return errors.New(err.Error())
		}
	}
	return nil
}

// ValidateData 全局model数据验证器
func ValidateStructCN(data interface{}) error {
	//验证
	zh_ch := zh.New()
	validate := validator.New()
	//注册一个函数,获取struct tag里自定义的label作为字段名
	validate.RegisterTagNameFunc(func(fld reflect.StructField) string {
		name := fld.Tag.Get("label")
		return name
	})

	uni := ut.New(zh_ch)
	trans, _ := uni.GetTranslator("zh")
	//验证器注册翻译器
	zh_translations.RegisterDefaultTranslations(validate, trans)
	err := validate.Struct(data)
	if err != nil {
		for _, err := range err.(validator.ValidationErrors) {
			return errors.New(err.Translate(trans))
		}
	}
	return nil
}
其他类似的还有
插件化路由和Handler
TODO
GraphQL
TODO
pb类型到struct的快速复制
借助copier,可以实现pb消息到golang struct的复制。对于一般的pb消息没有问题,但是对于wrapper的pb消息,则需要进行一定的方法扩展。copier提供了用户添加自定义转换规则的选项。我将常见的wrappervalue进行了封装 https://github.com/tiny-lib/copieroptpb 包只有一个方法。简单示例:
import "github.com/tiny-lib/copieroptpb"
....
// biz层结构体
user:=&User{}
// req.User 为protobuf中定义的结构体
if err := copier.CopyWithOption(req.User, user, copieroptpb.Option()); err != nil {
    return nil, err
}
数据脱敏及安全
参考
- https://github.blog/2022-10-26-why-and-how-gith
- https://securecode.wiki/docs/lang/golang/ub-encrypts-sensitive-database-columns-using-activerecordencryption/
- https://github.com/bytedance/godlp
- https://github.com/sachaservan/pir
- https://github.com/ggwhite/go-masker
- https://github.com/anu1097/golang-masking-tool